Planimetric orthophotos
- Omar Lamrani
- Solutions Geo-Plus (Unlicensed)
- Anonymous
Version française
Menu: Analyze / Planimetric orthophotos
This tool generates planimetric orthophotos from the point cloud. A single image or a mosaic of images can be created. The orthophotos are created with a white or a transparent background from an orthogonal top view with the requested pixel size.
The value associated to each pixel depends on what setting was used:
- Intensity displays the intensity value of the last point found in the pixel. The number of Iterations will fill empty pixels when at least 2 neighbors contain that value. The Iteration will repeat itself the number of times inscribed in the text box. The Auto adjust option will recalibrate the intensity of the tile according to the minimum and maximum intensity values, adjusting the brightness of all the tiles together. The background of the orthophotos is always white.
- RGB displays the RGB value attributed to the last point found in the pixel. It can contain a Opacity value from 0 (completely transparent) to 100 (completely opaque). When completely opaque, le background color will be white. Otherwise, the background will be completely transparent.
- By color displays a pixel as a color if a point is present or not in the pixel. When at least 1 point is present, the pixel will contain the requested pixel color. When no points are present, the pixel will automatically be transparent. The Opacity value applies only to pixels that have been colored, ranging from 0 (completely transparent) to 100 (completely opaque).
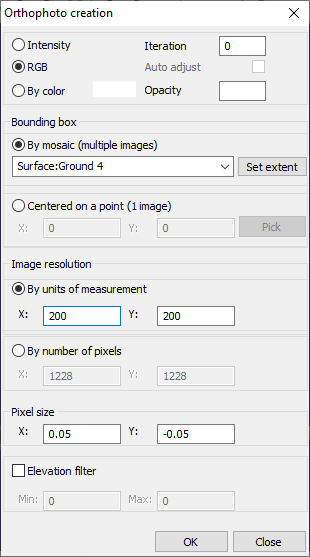
The Bounding box determines the center point for the orthophoto or the extent of the mosaic.
- By choosing By mosaic, the function generates tiled orthophotos of the specified dimension in the Image resolution section. The available options for the mosaic creation are the Entire project, which will consider the extent of the VisionLidar project, or any previously created surfaces that are present in the Explorer in the surfaces from the objects tab. The tiles will be named following the X_Y values where X is the column and Y is the column. Any tiles not containing a point will not be created. Set extent will set the size of the images on the total extent of the mosaic.
- By choosing Centered on a point, the user must pick a center point on the screen or specify the coordinates. This method will only generate one orthophoto at the requested image resolution centered at the specified coordinate.
The Image resolution defines the size of the images as well as the size of their pixels.
- Units of measurement determines the total size of the image in X and in Y, in the same measurement system as the project. If the button Bounding box was used, these values represent the total area of the mosaic and therefore only one image will be generated. If the number of pixels are modified, these values will be greyed out and will change automatically to reflect the specified dimensions.
- Pixels determines the number of pixels in X and in Y for an image. If the button Bounding box was used, these values represent the size of the image and will correspond to the total surface with the requested pixel size. If the Units of measurement are modified, these values will be greyed out and will change automatically to reflect the number of pixels necessary to occupy the area requested by the inscribed image resolution.
- Pixel size determines the dimension the pixels will have in the units of measurement of the project. The button Set extent uses this value to determine the two preceding values.
The Elevation option acts as a filter for the orthophoto creation. If the image is centered around a point or is created with the Entire project option, the elevation values represent the Z value of each point in the point cloud. If, however, a surface is selected in the Mosaic drop-down list the elevation will be relative to the surface. This allows the user to, for example, create an image of the ground points or within a certain interval from the ground.
When the OK button is pressed, if Mosaic was selected, a message will mention the maximum number of tiles which can be generated. Tiles that do not contain any points will not be generated. A prompt will require the user to specify where to save the images. When creating a mosaic, after the specified name, the suffix x_y will be added indicating the value of the column and the row. The images are exported in Tiff format; tiff files with a georeference in the header. These images may be used as Tiff files as well, the extension simply can be renamed and can be used normally.